
Can’t do a pull-up yet? The good news: with a smart progression, your first clean rep is absolutely within reach.
Nearly everyone struggles with their first pull-up. Elite athletes admit early failures because it exposes weaknesses in back strength, scapular control, and eccentric lowering that other exercises gloss over.
Pull-ups reign as the undisputed kings of vertical pulling exercises, demanding raw upper-body strength, strong grip, and total-body tension in one brutal move. Unlike rows or lat pulldowns, pull-ups force you to hoist your entire bodyweight from a dead hang to chin-over-bar using only your lats, biceps, core, and forearms—no momentum, no shortcuts.
Why Most Beginners Struggle With Pull Ups
The biggest mistake beginners make is “testing” pull-ups instead of training them. Jumping to the bar, failing a few reps, and dropping down doesn’t build the strength you need. You need:
- Pulling strength (to engage your back safely).
- Eccentric control (to handle your bodyweight on the way down).
- A smart way to “bridge the gap” between assisted and full bodyweight.
This progression solves all three problems with a clear path from easiest to hardest.
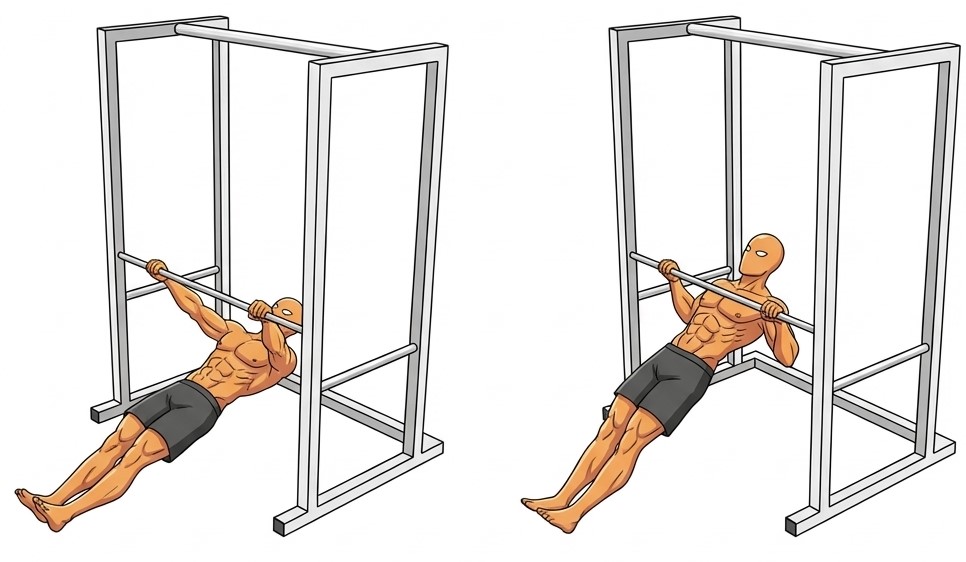
Step 1: Inverted Rows – The Perfect Starting Point
Inverted rows are the simplest way to start building real back strength for your first pull-up. They let you adjust difficulty easily and learn how to pull with your back instead of just your arms.
How to do inverted rows in a squat rack:
- Set a bar in the rack around hip height.
- Lie underneath the bar and grab it with an overhand grip, slightly wider than shoulder-width.
- Walk your feet forward and straighten your body so you’re in a rigid plank from shoulders to heels.
- Pull your chest up to the bar, squeezing your shoulder blades together at the top.
- Lower yourself back down under control.
Focus on:
- Keeping your body straight (no sagging hips).
- Touching your chest to the bar each rep.
- Moving slowly and with control, especially on the way down.
Train inverted rows until they feel solid and you can perform multiple clean sets without losing form. This is your foundation.
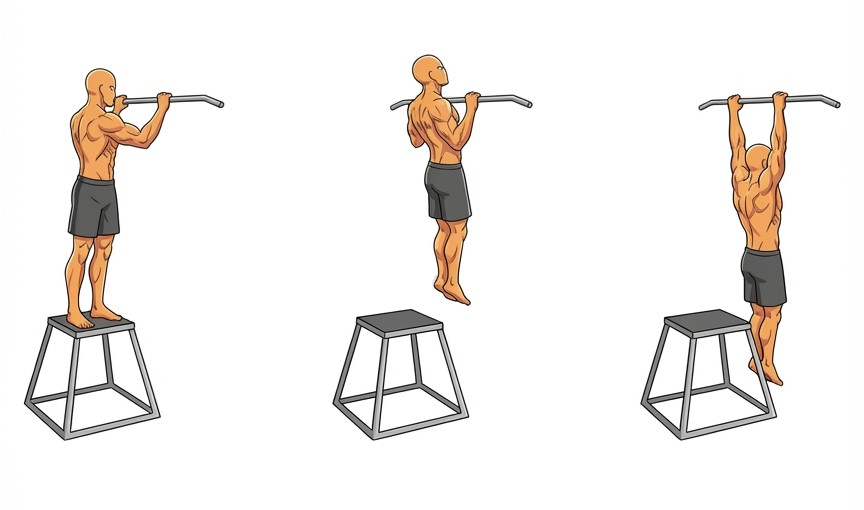
Step 2: Negative Pull Ups – Owning the Descent
Once your rows are strong, it’s time to teach your body to handle your full weight on the bar. Negative pull-ups focus on the lowering phase, which your muscles can usually handle before they can manage a full pull.
How to do negative pull-ups with a box:
- Place a sturdy box or bench under the pull-up bar.
- Step up on the box and grab the bar with an overhand grip, shoulder-width apart.
- Use your legs to help you start at the top: chin over the bar.
- From there, slowly lower yourself all the way down into a dead hang, taking about three to five seconds.
- Step back onto the box and repeat.
Key cues:
- Keep your shoulders “packed” (down and away from your ears).
- Don’t drop—fight gravity the whole way.
- Think smooth, controlled descent, not “fall and catch.”
Negatives build tendon strength, control, and confidence on the bar—critical for that first full rep.
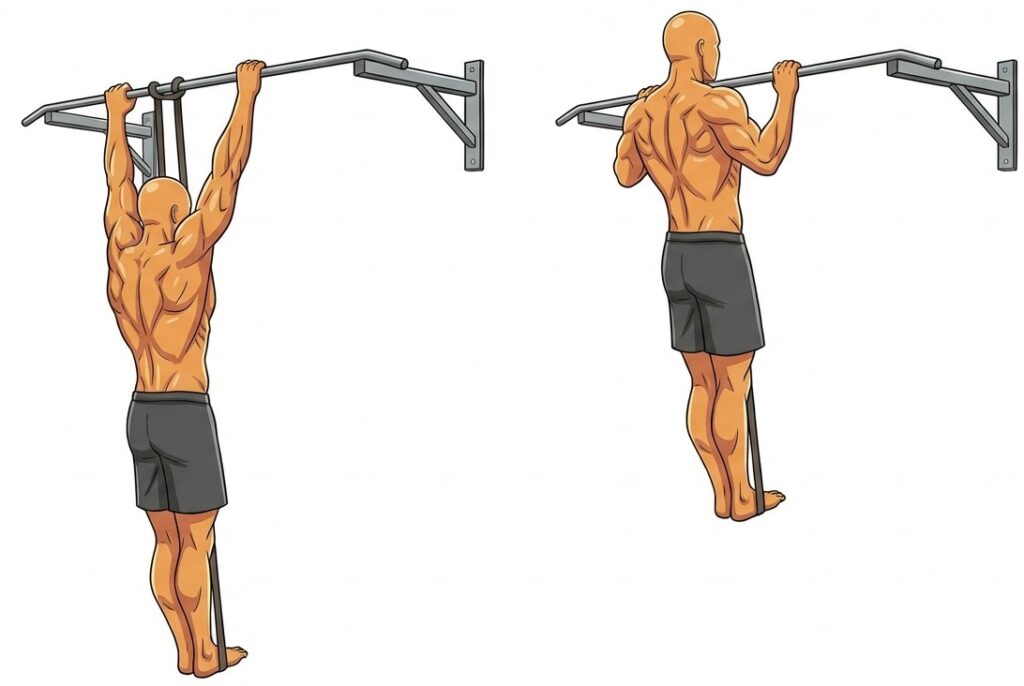
Step 3: Band Pull Ups – Smart Assistance
Loop a resistance band (medium to heavy) around the pull-up bar and place your foot in the band—this counters just enough bodyweight to make the pull doable while keeping tension on your lats and arms.
How to execute band pull-ups:
- Secure the band over the bar, step into the loop (knee or foot), and grab the bar shoulder-width overhand.
- Start from a dead hang with shoulders packed—let the band reduce the load as you hang.
- Pull your elbows down and back explosively to drive your chin over the bar, squeezing your back at the top.
- Lower slowly under control, resisting the band’s pull to maximize eccentric strength.
Focus on:
- Minimal leg drive—let your upper body lead every rep.
- Full range: dead hang start to chin-over finish.
- Slow negatives (3-5 seconds) for max strength gains.
Aim for minimal band tension over time—go lighter bands as you get stronger.
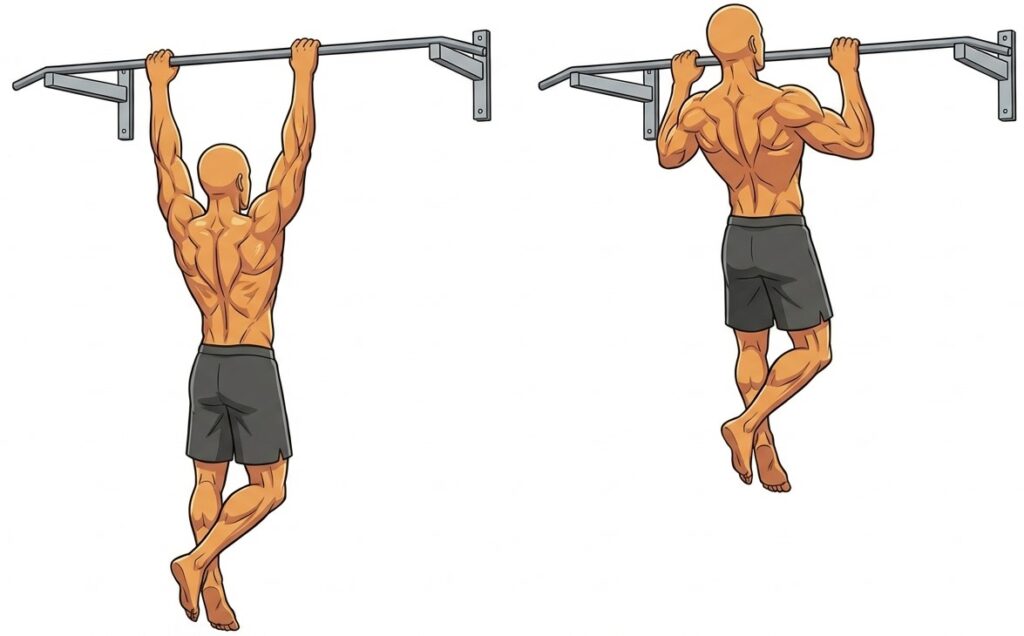
Step 4: The Full Pull Up – First Clean Rep
Now comes the payoff: your first strict pull-up. Think of all the previous work as building blocks; this is where they come together.
How to perform a full pull-up:
- Hang from the bar with an overhand grip, shoulder-width apart.
- Start in a dead hang, then pack your shoulders by pulling them slightly down and back.
- Brace your core like a plank—no swinging or kicking.
- Drive your elbows down toward your ribs and pull your chest up to the bar.
- Aim to get your chin clearly above the bar.
- Pause briefly, then lower yourself slowly and with control.
Helpful mental cues:
- “Pull the bar down to your chest.”
- “Elbows to ribs.”
- “Slow on the way down.”
Even if you manage just one clean rep, that’s your breakthrough. From there, you can slowly add more reps and sets over time.
Pull-Up Progression Sets & Reps
| Exercise | Sets | Target Reps | Tempo Notes | Rest Between Sets |
|---|---|---|---|---|
| Inverted Rows | 3 | 8-12 | 2 sec up, 2 sec down | 60-90 sec |
| Negative Pull-Ups | 3 | 5-6 | 3-5 sec slow descent | 90-120 sec |
| Band Pull-Ups | 3 | 6-8 | Explosive up, 2 sec down | 90 sec |
| Full Pull-Ups | 3 | 1-3 (max clean) | Full control both ways | 2 min |
Final Tips to Speed Up Your First Pull Up
A few details can make a big difference:
- Keep your grip training strong: hangs from the bar help.
- Cut excessive swinging and kipping—focus on clean, strict reps.
- Film yourself occasionally to check technique and track progress.
Most importantly, remember: not doing a pull-up yet doesn’t define your strength. It just marks where your journey starts. Follow this progression, stay patient, and that first rep will come.